NER-powered Semantic Search using LanceDB + Hamilton + HuggingFace
A blueprint for building your own modular, maintainable, self-documenting, processing pipeline to extract entities for use in search and RAG contexts.
In this post we’ll walk through an example pipeline written in Hamilton to embed some text, and also capture extra metadata about the text that will be used when searching, e.g. looking up data for retrieval augmented generation (RAG), via semantic search with LanceDB. We use data & models found on HuggingFace.
Why capture, or rather extract (as you’ll see), extra metadata? Because you can use it to filter results to improve accuracy. You’ll need more than just cosine similarity to achieve a quality system [1]. Named Entity Recognition (NER) is just one approach to gather extra metadata from text that can be used for this purpose.
In short, we use the NER model to further filter the semantic search results. The predicted named entities are used as “filters” (pre or post) to filter the vector search results.
This post is structured in the following way:
We explain briefly what NER is.
We explain how this fits into a RAG use case.
We introduce LanceDB and Hamilton.
We then walkthrough the code structure that we create with Hamilton.
Lastly we discuss changes, modifications, and things that you’re likely to make/think about if you use this code as a blueprint.
Note: this post is based on a post found on the LanceDB blog; we structure the code with Hamilton and make use of HuggingFace datasets throughout, and then go further by talking about production / next step considerations.
If you prefer, you can read this post via this notebook, as well as run it on google collab here, or simply see check out the code here.
What is NER?
Named Entity Recognition (NER) is a technology used in natural language processing (NLP). Imagine you're reading a story and you want to find all the names of people, places, or important things in it. NER is a technique that can automatically scan the story and highlight these names for you.
For example, if you have a sentence like "Alice went to Paris with Bob," NER will recognize and highlight "Alice" and "Bob" as names of people, and "Paris" as the name of a place.
In simpler terms, NER is a technique to pick out specific names and important words from text, making it easier to organize and find information.
NER and RAG?
Retrieval augmented generation (RAG) requires one to select the right content for passing to a large language model (LLM) for text generation. With ever growing LLM context windows, it maybe tempting to pass more and more context into a prompt. However, this can increase your costs, and it might overwhelm the LLM with less relevant information leading to poor results (see “finding a needle in a haystack evaluations”). NER in a RAG context can be used to help ensure only the most relevant documents are surfaced. NER would be used while processing documents and queries to get extra metadata about the documents & query, which can then be used filter results before you feed them into an LLM.
What is LanceDB?
LanceDB is an open-source, developer-friendly database designed for managing and querying large-scale multimodal AI data, such as text, images, videos, and more. Built with a focus on vector search, it supports efficient storage, retrieval, and filtering of embeddings. LanceDB offers production-scale vector search capabilities without the need for managing servers, making it highly scalable and easy to integrate into AI applications.
Key features of LanceDB include:
Persistent Storage: Simplifies the management of embeddings and other data types.
Multimodal Data Handling: Supports storing, querying, and filtering across various data types like text, images, videos, and point clouds.
Vector and Full-Text Search: Enables efficient searches based on vector similarity as well as full-text search capabilities.
Versioning and Reproducibility: Automatically handles data versioning, ensuring data integrity and reproducibility.
Ecosystem Integrations: Works seamlessly with tools like Python, JavaScript/TypeScript, LangChain, Apache Arrow, Pandas, Polars, and DuckDB.
LanceDB is built on top of the Lance format, an open-source columnar data format optimized for machine learning workloads, providing high-speed random access and efficient data management.
What is Hamilton?
Hamilton, developed by DAGWorks Inc., is an open-source framework designed to help data scientists and engineers create, manage, and optimize dataflows using Python functions. At its core, Hamilton transforms these functions into a Directed Acyclic Graph (DAG) that captures the dependencies between transformations. This approach facilitates the creation of modular, testable, and self-documenting data pipelines that encode lineage and metadata, making it easier to manage and understand data processes.
Hamilton runs anywhere that Python runs, and runs inside systems like Jupyter, Airflow, FastAPI, etc.
Key features of Hamilton include:
Modular Dataflows: Each function in Hamilton represents a specific data transformation, making it easier to build and maintain complex workflows.
Automatic DAG Creation: Functions are automatically connected into a DAG based on their dependencies, allowing for efficient execution and optimization.
Visualization and Monitoring: Hamilton provides optional tools to visualize and monitor dataflows, enhancing transparency and debugging capabilities.
Integration with Existing Tools: It can be used alongside other data processing tools and libraries such as Pandas, Dask, and Ray, allowing for seamless integration into existing workflows.
Hamilton is particularly useful for building scalable data processing pipelines, that are unit testable & documentation friendly, which ensures that the codebase remains organized and maintainable as projects grow in complexity.
How does Hamilton work?
Define
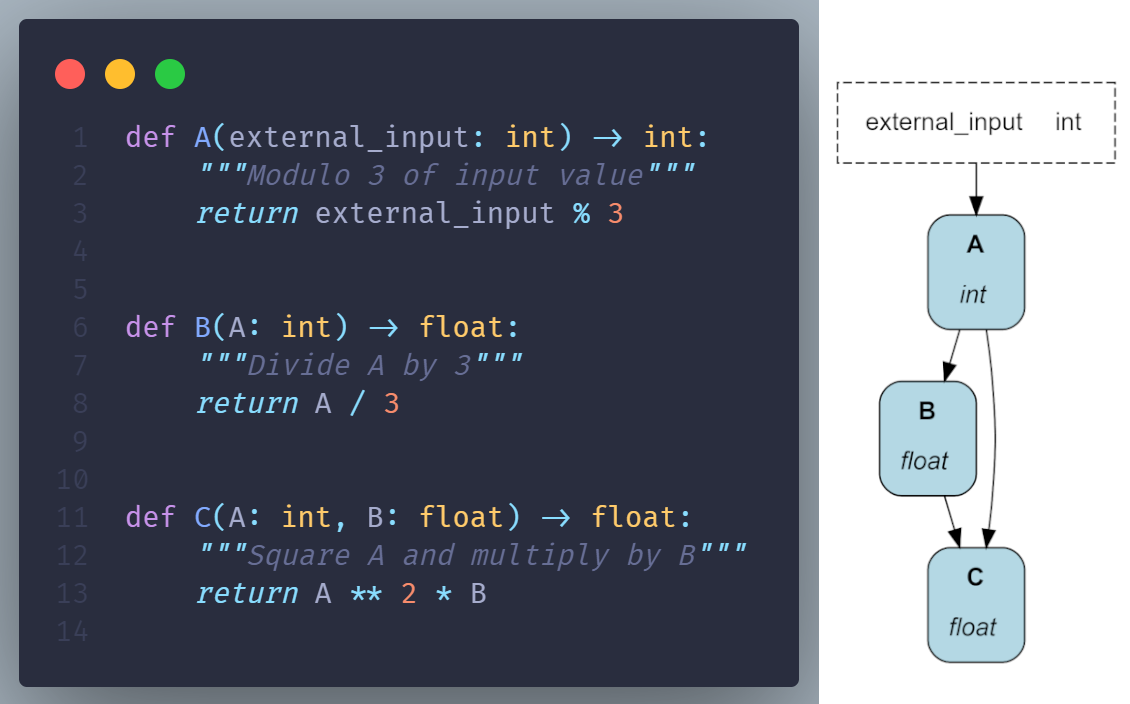
Hamilton uses a declarative approach to expressing a DAG. Developers write regular Python functions to declare what can be computed using the function name, in Hamilton they’re called “nodes”, while each Python function also declares dependencies using the function parameter name and type.

Assemble
Contrary to imperative approaches, Hamilton is responsible for loading definitions and automatically assembling the DAG. This is done through the Driver object:
from hamilton import driver
import definitions  # contains node definitions, e.g. A, B, C from above

dr = driver.Builder().with_modules(definitions).build()
Execute
To execute code, users request nodes and Hamilton determines the recipe to compute them on the fly.
Compute all nodes and only return value for “C”:
# request node named "C"; returns a dictionary of results
results = dr.execute(["C"], inputs={"external_input": 7})
Compute only nodes “A” & “B” and return value for “B”:
# request node named "B"; returns a dictionary of results
results = dr.execute(["B"], inputs={"external_input": 7})
Compute all nodes and return their values:
# request node named "B"; returns a dictionary of results
results = dr.execute(["A", "B", "C"], inputs={"external_input": 7})
Code Structure
Here’s the high level overview of what we will be creating in this post. We will create two paths, one for loading data into LanceDB, and another for inference. If you prefer, you can read this post via this notebook, as well as run it on Google Collab here, or check out the code here.

Loading Data
We start by first loading the dataset from HuggingFace. We use a built in DataSaver that comes with Hamilton that makes it easy to pull in a HuggingFace dataset.
from datasets import Dataset
from hamilton.function_modifiers import load_from, save_to, value

@load_from.hf_dataset(
    path=value("fabiochiu/medium-articles"),
    data_files=value("medium_articles.csv"),
    split=value("train"),
)
def medium_articles(dataset: Dataset) -> Dataset:
    """Loads medium dataset into a hugging face dataset"""
    return dataset
We then sample the dataset – in real life we’d use the full data set. We sample here to make this example tractable to run locally in a minute or two. Otherwise we modify the data set in the following way:
We remove documents with empty titles and text.
We truncate text to only be the first 1000 characters. This is to limit the dataset size, but to also make it fit into our the context window that creates our embeddings. In real life you’d probably want to process the entire text somehow, or create separate embeddings for different text chunks, etc.
Further to simplify things, we combine the title & text into a single field for NER & embedding purposes. We assume the title and the first 1000 characters of text contain enough information to get a general gist of the document to create an embedding and get relevant entities out.
def sampled_articles(
    medium_articles: Dataset,
    sample_size: int = 104,
    random_state: int = 32,
    max_text_length: int = 1000,
) -> Dataset:
    """Samples the articles and does some light transformations.
    Transformations:
     - selects the first 1000 characters of text. This is for performance here. But in real life you'd do something for your use case.
      - Joins article title and the text to create one text string.
    """
    # Filter out entries with NaN values in 'text' or 'title' fields
    dataset = medium_articles.filter(
        lambda example: example["text"] is not None
           and example["title"] is not None
    )

    # Shuffle and take the first 10000 samples
    dataset = dataset.shuffle(seed=random_state).select(range(sample_size))

    # Truncate the 'text' to the first 1000 characters
    dataset = dataset.map(
        lambda example: {"text": example["text"][:max_text_length]})

    # Concatenate the 'title' and truncated 'text'
    dataset = dataset.map(
       lambda example:
          {"title_text": example["title"] + ". " + example["text"]})
    return dataset
NER Tokenizer & Model
Next we load the tokenizer and NER model that will become our NER pipeline to extract entities. The NER model here is finetuned on a BERT-base model. All the models are loaded from huggingface.
import torch
from transformers import (
    AutoModelForTokenClassification,
    AutoTokenizer,
    PreTrainedModel,
    PreTrainedTokenizer,
    pipeline,
)
from transformers.pipelines import base

def device() -> str:
    """Whether this is a CUDA or CPU enabled device."""
    return "cuda" if torch.cuda.is_available() else "cpu"


def NER_model_id() -> str:
    """Model ID to use
    To extract named entities, we will use a NER model finetuned
    on a BERT-base model.
    The model can be loaded from the HuggingFace model hub.
    Use `overrides={"NER_model_id": VALUE}` to switch this without
    changing code.
    """
    return "dslim/bert-base-NER"


def tokenizer(NER_model_id: str) -> PreTrainedTokenizer:
    """Loads the tokenizer for the NER model ID from huggingface"""
    return AutoTokenizer.from_pretrained(NER_model_id)


def model(NER_model_id: str) -> PreTrainedModel:
    """Loads the NER model from huggingface"""
    return AutoModelForTokenClassification.from_pretrained(NER_model_id)


def ner_pipeline(
    model: PreTrainedModel,
    tokenizer: PreTrainedTokenizer,
    device: str
) -> base.Pipeline:
    """Loads the tokenizer and model into a NER pipeline.
    That is it combines them."""
    device_no = torch.cuda.current_device() if device == "cuda" else None
    return pipeline(
        "ner", model=model, tokenizer=tokenizer, aggregation_strategy="max", device=device_no
)Let’s try to use the NER pipeline to extract named entities from the text.
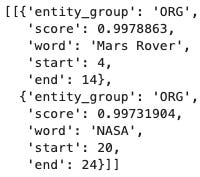
# this is what the NER pipeline produces
text = "The Mars Rover from NASA reached the red planet yesterday."
ner_pipeline(
   model(NER_model_id()),
   tokenizer(NER_model_id()),
device())([text])Embedding (retriever) model
Next we load the retriever model that will create embeddings, i.e. a vector/list of floats, that encode our text. Specifically it will embed passages (article title + first 1000 characters) and also be used to create an embedding from the search query that will be provided at inference time. It creates embeddings such that queries and passages with similar meanings are close in the vector space. We will use a sentence-transformer model as our retriever. The model can be loaded using the following code.
from sentence_transformers import SentenceTransformer

def retriever(
    device: str,
   retriever_model_id: str = "flax-sentence-embeddings/all_datasets_v3_mpnet-base"
) -> SentenceTransformer:
    """Our retriever model to create embeddings.

    A retriever model is used to embed passages
    (article title + first 1000 characters)
    and queries. It creates embeddings such that queries
    and passages with similar meanings are close in the
    vector space. We will use a sentence-transformer model
    as our retriever. The model can be loaded as follows:
    """
    return SentenceTransformer(retriever_model_id, device=device)
Extracting Entities & Embeddings
Next let’s put this all together to extract entities & embed the documents.
We do this by using Huggingface dataset’s map functionality. Using this ensures that data can be loaded into batches to ensure that data hungry GPUs are appropriately fed with data. What you need to provide to this function is a function that contains the logic you want to apply to it. So below we create some helper functions for that purpose. This also helps ensure unit testability, while also keeping the code clean. We then wire these helper functions up to the map functions to create the embedding and named_entities columns on the dataset.
from datasets.formatting.formatting import LazyBatch
from typing import Union

def _extract_named_entities_text(
    title_text_batch: Union[LazyBatch, list[str]], _ner_pipeline
) -> list[list[str]]:
    """Helper function to extract named entities given
    a batch of text."""
    # extract named entities using the NER pipeline
    extracted_batch = _ner_pipeline(title_text_batch)
    # this should be extracted_batch = dataset.map(ner_pipeline)
    entities = []
    # loop through the results and only select the entity names
    for text in extracted_batch:
        ne = [entity["word"] for entity in text]
        entities.append(ne)
    _named_entities = [list(set(entity)) for entity in entities]
    return _named_entities


def _batch_map(dataset: LazyBatch, _retriever, _ner_pipeline) -> dict:
    """Helper function to created the embedding vectors
    and extract named entities"""
    title_text_list = dataset["title_text"]
    emb = _retriever.encode(title_text_list)
    _named_entities = _extract_named_entities_text(
        title_text_list, _ner_pipeline)
    return {
        "vector": emb,
        "named_entities": _named_entities,
    }


def columns_of_interest() -> list[str]:
    """The columns we expect to pull from the dataset
    to be saved to lancedb"""
    return ["vector", "named_entities", "title",
            "url", "authors", "timestamp", "tags"]


def final_dataset(
    sampled_articles: Dataset,
    retriever: SentenceTransformer,
    ner_pipeline: base.Pipeline,
) -> Dataset:
    """The final dataset to be pushed to lancedb.

    This adds two columns:

     - vector -- the vector embedding
     - named_entities -- the names of entities extracted from the text
    """
    # goes over the data in batches so that the GPU
    # can be properly utilized.
    final_ds = sampled_articles.map(
        _batch_map,
        batched=True,
        fn_kwargs={"_retriever": retriever,
                   "_ner_pipeline": ner_pipeline},
        desc="extracting entities",
    )
    return final_ds
Lastly we can now load the data into LanceDB. We do this by using the functionality that comes with Hamilton to specify saving data via a DataSaver by annotating the `final_dataset` function above. See next code cell for the code that actually executes the DAG we’ve defined.
@save_to.lancedb(
    db_client=source("db_client"),
    table_name=source("table_name"),
    columns_to_write=source("columns_of_interest"),
    output_name_="load_into_lancedb",
)
def final_dataset(
    sampled_articles: Dataset,
    retriever: SentenceTransformer,
    ner_pipeline: base.Pipeline,
) -> Dataset:
    """The final dataset to be pushed to lancedb.

    This adds two columns:

     - vector -- the vector embedding
     - named_entities -- the names of entities extracted from the text
    """
    # goes over the data in batches so that the GPU
    # can be properly utilized.
    final_ds = sampled_articles.map(
        _batch_map,
        batched=True,
        fn_kwargs={"_retriever": retriever, "_ner_pipeline": ner_pipeline},
        desc="extracting entities",
    )
    return final_ds
import ner_module # we assume the above code lives here
import lancedb
from hamilton import driver, lifecycle
dr = (
    driver.Builder()
    .with_config({})
    .with_modules(ner_module)
    .with_adapters(lifecycle.PrintLn())
    .build()
)
table_name = "medium_docs"
db_client =  lancedb.connect("./.lancedb")

results = dr.execute(
    ["load_into_lancedb"],
    inputs={"table_name": table_name,
            "db_client": db_client},
)
Now that we’ve loaded the data into lancedb, we can query over it and use it for RAG.
Inference
We need to write the inference dataflow to then retrieve the right content given a user query.
import lancedb
import numpy as np

def named_entities(query: str, ner_pipeline: base.Pipeline) -> list[str]:
    """The entities to extract from the query via the pipeline."""
    return _extract_named_entities_text([query], ner_pipeline)[0]

def lancedb_table(db_client: lancedb.DBConnection, table_name: str = "tw") -> lancedb.table.Table:
    """Table to query against"""
    tbl = db_client.open_table(table_name)
    return tbl


def lancedb_result(
    query: str,
    named_entities: list[str],
    retriever: SentenceTransformer,
    lancedb_table: lancedb.table.Table,
    top_k: int = 10,
    prefilter: bool = True,
) -> dict:
    """Result of querying lancedb.

    :param query: the query
    :param named_entities: the named entities found in the query
    :param retriever: the model to create the embedding from the query
    :param lancedb_table: the lancedb table to query against
    :param top_k: number of top results
    :param prefilter: whether to prefilter results before cosine distance
    :return: dictionary result
    """
    # create embeddings for the query
    query_vector = np.array(retriever.encode(query).tolist())

    # query the lancedb table
    query_builder = lancedb_table.search(query_vector, vector_column_name="vector")
    if named_entities:
        # applying named entity filter if something was returned
        where_clause = f"array_length(array_intersect({named_entities}, named_entities)) > 0"
        query_builder = query_builder.where(where_clause, prefilter=prefilter)
    result = (
        query_builder.select(["title", "url", "named_entities"])  # what to return
        .limit(top_k)
        .to_list()
    )
    # could rerank results here
    return {"Query": query,
            "Query Entities": named_entities,
            "Result": result}
Let’s now try querying:
dr_query = ( # we rebuild the module with the new code
    driver.Builder()
    .with_config({})
    .with_modules(ner_module)
    .with_adapters(lifecycle.PrintLn())
    .build()
)
dr_query.execute(
    ["lancedb_result"],
    inputs={
        "table_name": table_name,
        "query": "Who is Joe Biden?",
        "db_client": db_client
    }
)
Here’s a snippet of the result:
{'lancedb_result': {'Query': 'Who is Joe Biden?',
  'Query Entities': ['Joe Biden'],
  'Result': [{'title': 'Not the neighborhood he left: Biden’s international challenge',
    'url': 'https://medium.com/@info-63603/not-the-neighborhood-he-left-bidens-international-challenge-d023f7ed26d0',
    'named_entities': ['United States',
     'Joe Biden',
     'Russia',
     'American',
     'Trump',
     'Biden',
     'China'],
'_distance': 0.9555794596672058}]}}Likely changes and things to think about
Increase the number of documents to process.
The code here by default is only meant to load 104 articles. You can go increase that value, to be able to query over the entire dataset in LanceDB. It’s always good to start with small data to verify before scaling to larger datasets. We’re confident the way that datasets are used here, will enable you to scale to any sized dataset.
Changing Embeddings
Different embedding models have difference performance characteristics on different text datasets. You’ll likely explore/try to find a model that works best for your domain. In which case you’d simply replace the retriever model function/specify another model.
Other considerations:
Vector length: different models have different vector lengths. This will impact your storage requirements. Usually longer vector embeddings can discriminate better between documents, but that requires more storage than shorter vector embeddings. This is something to play around with if you have a large data set size to contend with.
Text chunking: depending on what you want to return for your LLM, you might play around with what text you actually chunk & also store with LanceDB. Above we assumed the first 1000 characters of text was good enough to represent the entire medium article. Perhaps the better strategy would be to have multple embeddings of text for the same document to ensure we don’t get poor performance on large documents.
Filtering on more metadata
NER is just one way to add metadata to help us filter to documents. Depending on your context you might have other concerns, like only allowing people with the right authorizations to see certain documents. This is commonly implemented by access control lists (ACLs). You’d simply attach this metadata to the documents and then at query time filter out documents that a user shouldn’t have access to. In the case of medium articles, we might allow the user to specify the author they want to search over, or a time range of publication, so that information could also be stored in LanceDB so it could be filtered over.
Query expansion / more advanced filtering / Re-ranking
If our named entity filtering is too restrictive and we’re missing results because the user didn’t use the right words, we might consider “query expansion”. What this means is that we would expand the set of entities that would be acceptable filters. To get this expanded set of entities, we’d need to post process our extracted entities to find common synonyms or substitutes. That way we could expand the entities we query for to ensure we don’t miss a relevant document if the user didn’t use the exact word for it.
Alternatively, we could only apply the named entity filter on cosine similarity scores lower than some threshold. This would ensure we don’t filter out results too quickly; cosine values are returned from LanceDB with each result.
Lastly, we could take some other approach to rerank the results returned from LanceDB. There are many techniques, and off-the-shelf options here. E.g. Cohere, PongoAI, etc.
Using APIs instead of self-hosted GPU models
In this example we used off-the-shelf models and ran them locally / on a GPU. An alternative is use APIs provided by companies such as OpenAI, Anthropic, Cohere, etc. This however would require some code changes:
We would no longer need to load models, instead just hit APIs.
APIs can be parallelized. There are several approaches here:
Use Hamilton’s Parallelizable & Collect construct with Multithreading/Ray.
Use datasets.map functionality with batching and maybe multi-processing
Usual caveats to parallelization apply, namely make sure you understand serialization costs, and try simple things first, e.g. multi-threading versus multi-processing.
Evaluation
For production purposes it is common to curate a dataset to help ensure your system performs as expected. You can evaluate the results of your queries against LanceDB using search metrics like mean reciprocal rank (MRR). This would require you to annotate some data to provide as a gold standard.
If you were to then plug these results into your LLM for a full RAG system, then again you’d need to curate or produce a dataset to evaluate results against. Evaluation is trickier here and out of scope for this post. We direct readers to the RAGAS framework here.
Operational metadata: capturing iterations and results
When running in production you’ll need to track a few more things to help you operate and debug what you put into LanceDB.
Tracking executions
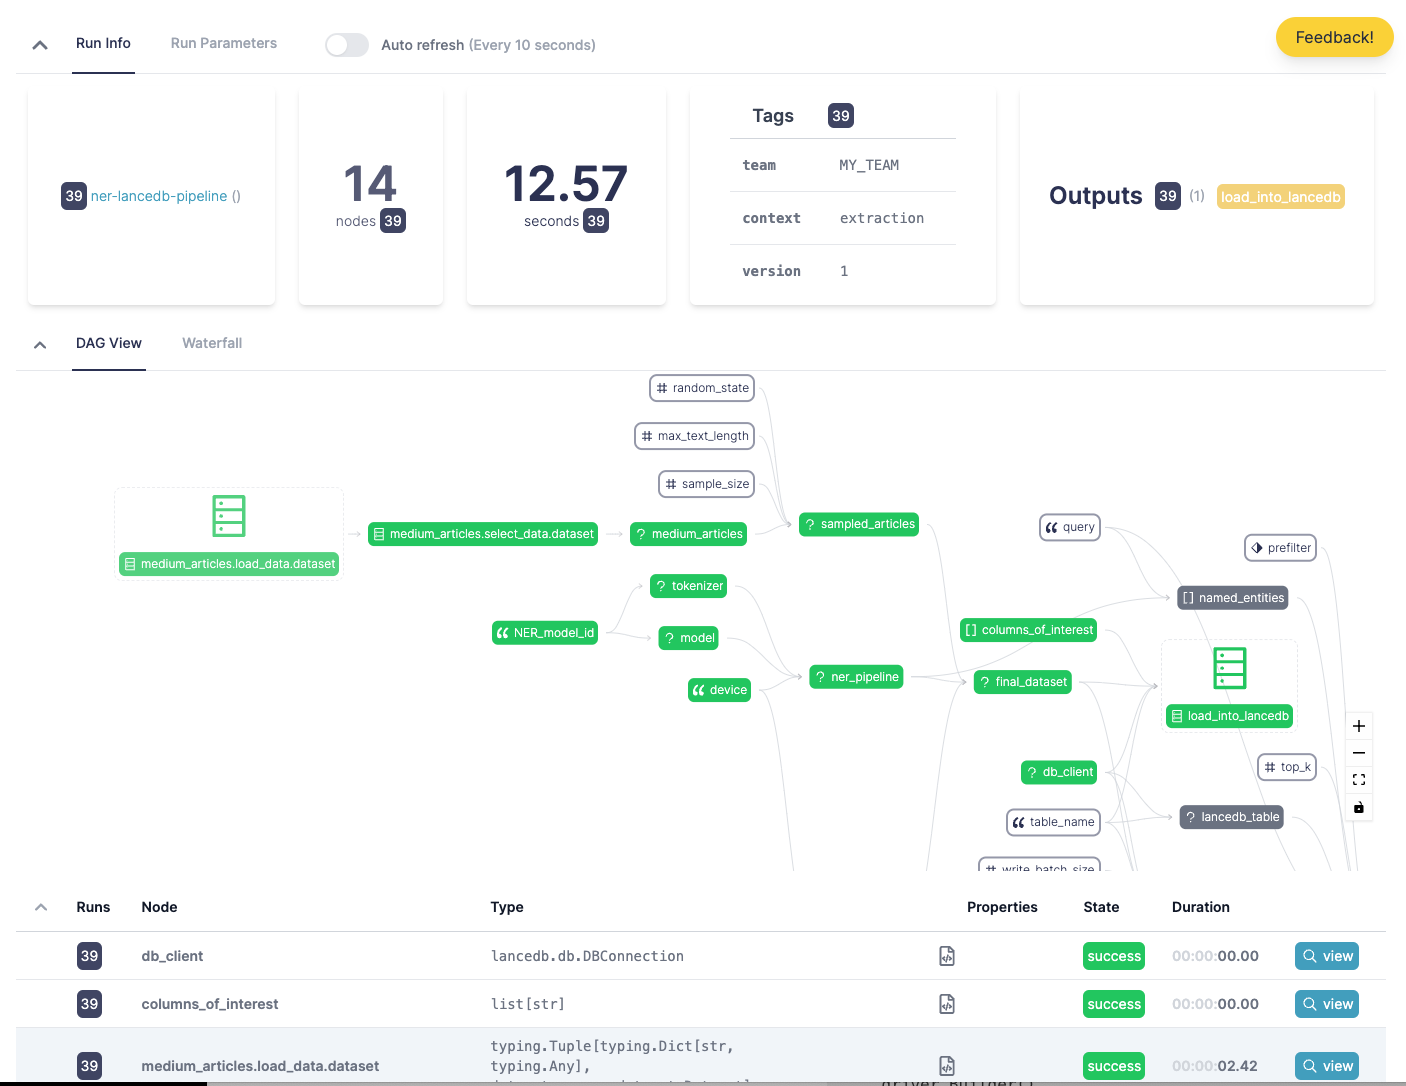
With Hamilton one could easily add code to track Hamilton executions and view the results in the Hamilton UI. This is useful if you want to monitor/debug/understand what your pipeline is doing in a single place! One just needs add a simple tracker and run some docker containers (or use the hosted version on www.dagworks.io), and then one can track code and datasets produced — see code in next section for how to integrate it with the above code.


Adding Run IDs
You’d also likely add operational metadata to your documents to help identify what processes created them. A classic example is to have a `RUN_ID` that identifies an invocation of the pipeline. By passing this into the HamiltonTracker as a tag, and modifying the code to also store it with data when writing to LanceDB by passing it as an input to execution. This can then enable a quick debug cycle, allowing you to easily identify given a document, the Hamilton execution that loaded data into LanceDB, that you can then come to the Hamilton UI to debug and understand what went on and what data was loaded.
from hamilton_sdk import adapters
import uuid

RUN_ID = str(uuid.uuid4())

tracker = adapters.HamiltonTracker(
    project_id=41,  # modify this as needed
    username="elijah@dagworks.io",  # modify this as needed
    dag_name="ner-lancedb-pipeline",
    tags={"context": "extraction",
          "team": "MY_TEAM",
          "run_id":  RUN_ID,
          "version": "1"},
)
dr = (
    driver.Builder()
    .with_config({})
    .with_modules(ner_module)
    .with_adapters(tracker)
    .build()
)
# you'd modify final_dataset() in the `ner_module` to take in `run_id`
# you'd store that with each row saved to LanceDB
# then you'd pass in the value as an input to .execute()
dr.execute(..., inputs={"run_id": RUN_ID})
Fine Tuning Embeddings
If you’re finding some documents are too close in cosine distance, then you can think about fine tuning them to more easily discriminate between them. E.g. you have product reviews that you’d like to discern better between. This is a process where you augment the vectors of your documents by fitting matrix that will adjust the values in it. For an example of doing this with Hamilton, we refer you to check out an example implementation on the Hamilton hub.
Summary
In this post we:
incrementally created a pipeline to process medium articles
the pipeline extracted named entities from the articles
the pipeline created vectors embeddings from text
we pushed all the data into lanceDB to then query against
we then discussed various extensions and caveats to think about
try out the Hamilton UI for more visibility into your pipelines.
Next steps to combine with RAG
We now have a database that we can query over medium articles via cosine similarity, as well as using extra metadata, in this case named entities referenced in the text, extracted to help us filter results.
With this general blueprint, you can then play around with and modify what context you would retrieve given a user query to then populate a prompt with to send to an LLM.
For example, we could take the URLs returned and load the article that way, or adjust what is stored in LanceDB and return text stored there, etc. If you'd like to build a conversational agent, we refer you to Hamilton's sister framework Burr that can help you build, curate, and debug your application.
Need help?
📢 Come join Hamilton’s Slack community to ask questions.
⭐️ Bookmark Hamilton by giving it a star.


Perfect tyme, my cycling app needs this precision.