Annotating Data in Burr
Iterate on your application, gather evaluation data, and review production runs with your team
Building Reliable AI
Why is it so hard to get AI systems into production? Among many reasons, you may be haunted by the fear of catastrophic hallucinations and strange behavior. While AI is dressed up to seem human-like, it is prone to errors similar to any other computer program. Specifically, if you’re not exact about what you want, it can produce troubling behavior. Cases of this have resulted in high-profile stories about companies that have proudly released their AI-driven features to production, only to be on the receiving end of lawsuits and unhappy customers. See, for example, the recent Air Canada lawsuit.
The downside is that it may never be possible to solve these problems perfectly – AI, at its current state, is neither precise enough nor appropriately incentivized to reliably *not* mess things up. The upside, however, is that you can be both proactive and reactive to these issues enough to feel confident in releasing your product. While there are multiple approaches to be proactive with Burr, we’re going to be talking about effectively reacting in this post.
The following strategies are table-stakes for anyone who wants to leverage AI seriously, E.G. in any part of their business that produces some value:
Full monitoring – know everything that happens, when it happens, and to whom
Further investigation – be able to dig into the data and react/save for later if anything goes wrong
Intervention – make alterations to the data/reach out to the impacted users
Retuning – take the mistakes an app made and ensure it doesn’t happen again
We’re going to be focusing on (2), (3), and (4). Specifically, how to mark data for further review, react to it, and use that data to retune the behavior of your application. For (1), see our original post on Burr and the Burr UI. No need to read these, however, as we’ll first conduct a quick overview of Burr.
Burr
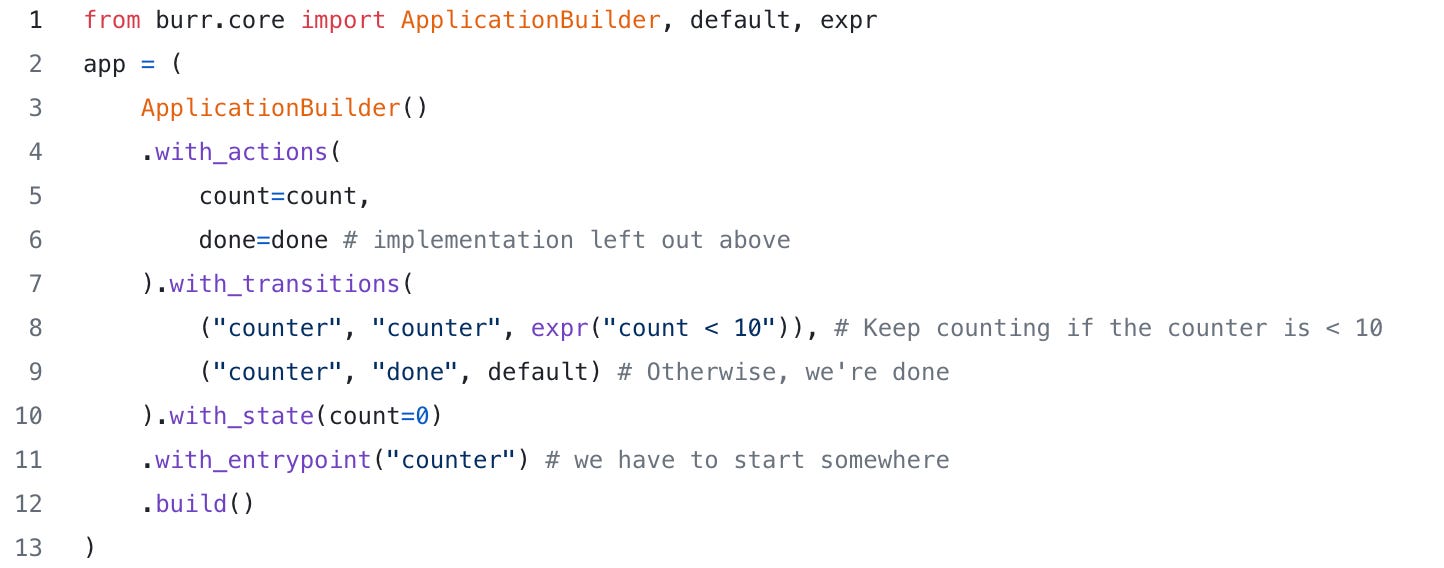
Burr is a lightweight Python library you use to build applications as state machines. You construct your application out of a series of actions (these can be either decorated functions or objects), which declare inputs from state, as well as inputs from the user. These specify custom logic (delegating to any framework), as well as instructions on how to update state. State is immutable, which allows you to inspect it at any given point. Burr handles orchestration, monitoring, persistence, etc…).

You run your Burr actions as part of an application – this allows you to string them together with a series of (optionally) conditional transitions from action to action.

Burr comes with a user-interface that enables monitoring/telemetry, as well as hooks to persist state/execute arbitrary code during execution.
You can visualize this as a flow chart, i.e. graph / state machine:
And monitor it using the local telemetry debugger:
While the above example is a simple illustration, Burr is commonly used for AI assistants (like in this example), RAG applications, and human-in-the-loop AI interfaces. See the repository examples for a (more exhaustive) set of use-cases.
Annotations in Burr
For the sake of this post, we’ll be using the “tool-calling” example from a prior blog post. No need to read it – the high-level is that we used the tool/function APIs to build an agent that chose between response modes and used prebuilt functions to answer as intended. We will be marking data we think is funky, reviewing it, then turning it back into a tuning set. One of the tools we will use will be query_weather, which takes in a latitude/longitude and gives out a free-form description of the weather – we’ll be using this as an example.
Reviewing
The new annotations feature in the UI allows you to mark steps in an application for any reason – E.G. say they’re a hallucination, flag them for review, marking the response as a good decision, etc… To do this, you click on the + symbol in the annotations column in a trace view, which opens up a dialog:
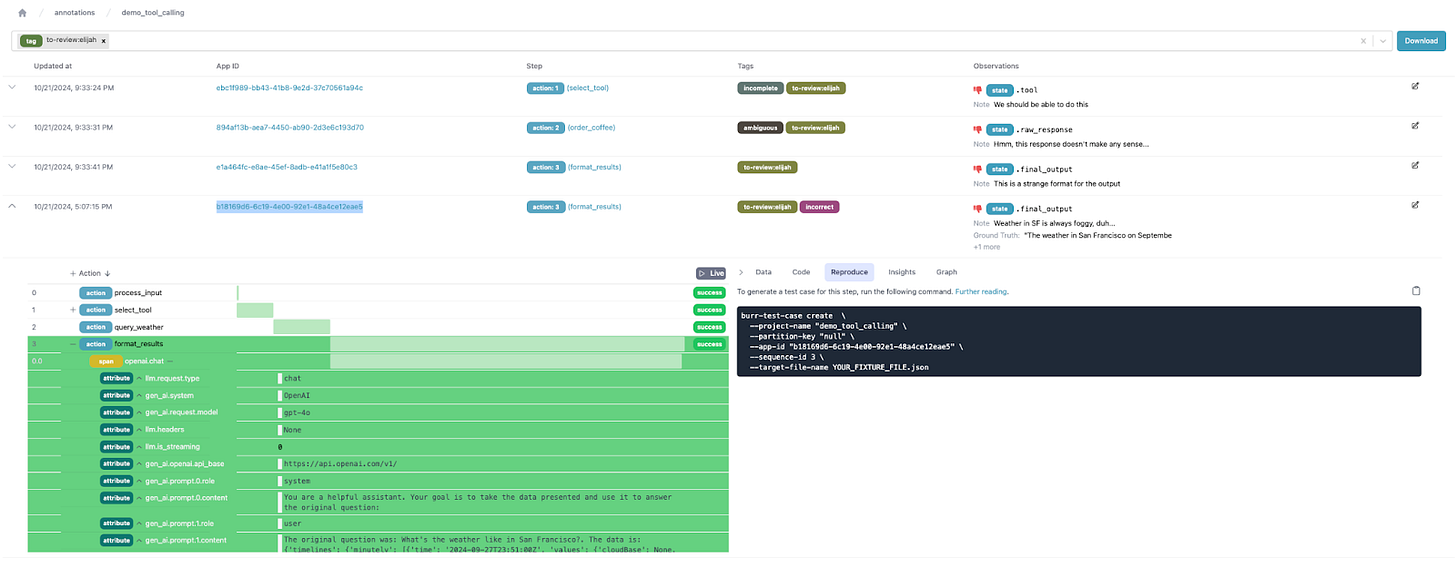
Annotations are identifiable by tags – these are free-form strings (with a set of common default values), that can help identify/query the data. An annotation consists of one or more observations, each on a specific data point (attribute, state field, etc…). These observations have a thumbs up/thumbs down capability, as well as free-form text and an (optional) ground truth. This allows for multiple observations (each associated with a datapoint).
You can then browse the annotations you created for your application with the “annotations” tab on the right hand side
Reacting
In the case of troubling behavior, you want to be able to react quickly. Burr’s annotation feature lets you query data by tags/action name, enabling you to use the tags as a queuing system for handling annotations. Say, for the sake of argument, that someone named Elijah is your trusty QA associate:
Back to the prior example, say we decide on a tag schema with the following tags:
hallucinationincorrectcorrectto-review:<name>(E.G.to-review:elijah)or reviewed-by:<name>(E.G.reviewed-by:elijah)urgent
In order to quickly react (and thus provide quality customer service), we can filter all the created annotations by tag at a project level. You can further review, modify tags, and edit annotations.
So, the workflow we anticipate is:
The developer/on-call person gets a complaint (or does a routine audit)
They immediately mark as
to-review:elijahElijah then goes through annotations marked as to-review, and reviews accordingly (marking them as
reviewed-by:elijah
Retuning
While we’ve talked about how to react to errors in your AI applications, annotating Burr application runs also gives you the capability to proactively change the behavior for later.
You can do this through two sets of provided tools:
Adding unit tests
To do so, you can click on the annotation in the project view, and you’ll get a full application view. You can then click on the “reproduce” tab, which will give you a command to create a test case.
See further documentation here on how to tune this.
Downloading data for fine-tuning
Click on the “Download” button next to the search bar to download the CSV of all relevant data! You can massage that to fine-tune your next model, train a new model from scratch, or have a dataset to send for debugging.
Wrapping up
In this post we showed how to leverage the Burr UI to quickly react to problematic behavior in your AI applications. We showed:
How to annotate/tag data
How to review that data
How to use that annotation data for evaluation/fine-tuning down the line
Leveraging these approaches can give you confidence on your application — both that you can quickly react to any negative user experiences and use that data to ensure they don’t happen in the future.
Next Steps
While the annotations feature is currently very powerful, we plan to implement the following:
Centralized schemas for tags, so that teams can more effectively collaborate
More advanced search capabilities for annotations
User-aware/team-specific queuing (related to (1))
And we’re building quick! Please reach out if you need any of these features or want to provide feedback, we’re building with use-cases in mind.
Further Reading
In the meanwhile:
Join our Discord for help or if you have questions!
Subscribe to our youtube to watch some in-depth tutorials/overviews
Star our Github repository if you like what you see
Check out the recent OpenTelemetry integration for additional observability
See the code for this post among our examples


