Travel Back in Time with Burr
Build a system that lets you rewind and debug from any point in time
Building systems with AI can be difficult. Once you get past the basic chatbot proxy for gpt-x/deploying your own LLM, you will inevitably hit a point where some automated decision has to be made:
Which documents are the most relevant to answer a query?
Which tool should I call?
Should I ask the user for feedback or proceed with my plan?
Is the result of this correct? Or is it just slop?
I hit a system failure, what should I display/how can we rectify?
And so on. In fact, visibility into complex decisions is not an inherently AI problem – every decision an application makes has the potential to go wrong and harm a user’s experience. With AI, however, the underlying tools the application uses (powerful and sometimes unwieldy fundamental models) are highly stochastic in nature, and the output mode (unstructured text/visuals/audio) is much harder to audit and evaluate.
The standard approach to this has been monitoring – if you can see the inputs to (state) and outputs from (result) every decision your application makes, you’ll have an easier time debugging. That said, it only tells you what happened in retrospect – correcting the decision, testing out multiple counterfactuals, and even swapping out the production results for another scenario have all been remarkably labor-intensive, non-generalizable tasks.
In this blog post we’ll talk about how to use the open-source library Burr to solve some of those problems. Not only will it help you gain visibility into the decisions your application makes but also rewind in time, load up your application, and fork it from any point in time for full debugging/evaluation.
We will go over the Burr library, talk about how to use it to persist/fork applications (using a simple hello-world example), then discuss the user story that motivated this: debugging LLM-based robot agents.
Burr
Burr is a lightweight python library you use to build applications as state machines. You construct your application out of a series of actions (these can be either decorated functions or objects), which declare inputs from state, as well as inputs from the user. These specify custom logic (delegating to any framework), as well as instructions on how to update state. State is immutable, which allows you to inspect it at any given point. Burr handles orchestration, monitoring, persistence, etc…)
@action(reads=["count"], writes=["count"])
def counter(state: State) -> State:
    return state.update(counter=state.get("count", 0) +1)
You run your Burr actions as part of an application – this allows you to string them together with a series of (optionally) conditional transitions from action to action.
from burr.core import ApplicationBuilder, default, expr
app = (
    ApplicationBuilder()
    .with_actions(
        count=count,
        done=done # implementation left out above
    ).with_transitions(
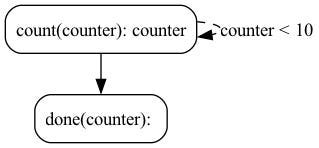
        ("counter", "counter", expr("count < 10")), # Keep counting if the counter is less than 10
        ("counter", "done", default) # Otherwise, we're done
    ).with_state(count=0)
    .with_entrypoint("counter") # we have to start somewhere
    .build()
)
Burr comes with a user-interface that enables monitoring/telemetry, as well as hooks to persist state/execute arbitrary code during execution.
You can visualize this as a flow chart, i.e. graph / state machine:
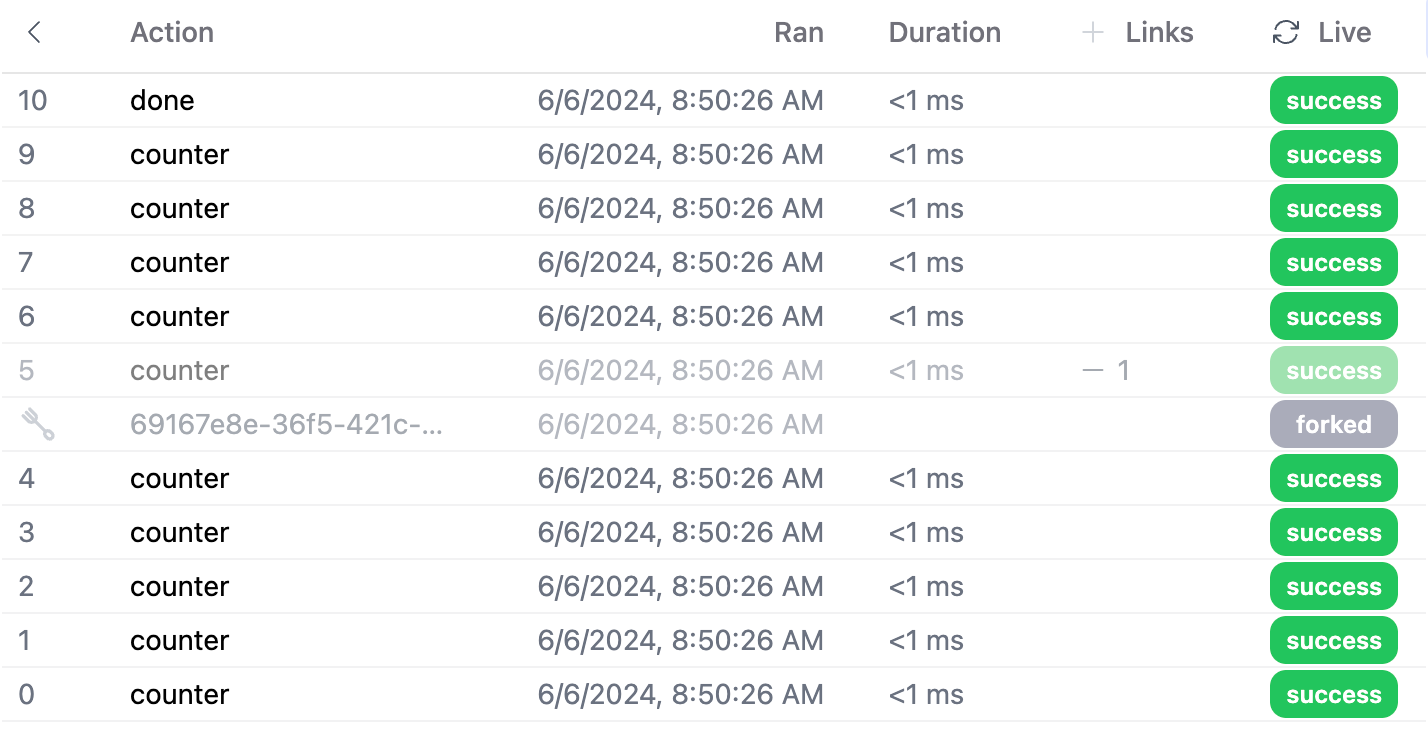
And monitor it using the local telemetry debugger:
While the above example is a simple illustration, Burr is commonly used for RAG applications, chatbots, and human-in-the-loop AI interfaces. See the repository examples for a (more exhaustive) set of use-cases.
Persisting/Forking Applications
To fork applications, you need to persist their state. This is a simple line of code to add, but is highly pluggable. You can use any of the builtin persisters (mongodb, sqllite, postgres, redis, etc…), or write your own to integrate with your preferred database/schema. The code is simple:
from burr.core import ApplicationBuilder, default, expr
from burr.core.persistence import SQLLitePersister

state_persister =  SQLLitePersister(
    db_path=".sqllite.db",
    table_name="burr_state"
)
state_persister.initialize() # set up tables, only need to call once

app = (
    ApplicationBuilder()
    .with_actions(
        count=count,
        done=done # implementation left out above
    ).with_transitions(
        ("count", "count", expr("counter < 10")), # Keep counting if the counter is less than 10
        ("count", "done", default)
    )
    .initialize_from(
        state_persister,
        resume_at_next_action=True,
        default_state={"count" : 0},
        default_entrypoint="count"
    )
    .with_state_persister(state_persister)
    .with_identifiers(app_id=PREVIOUS_APP_ID_OR_NONE)
    .build()
)
As you can see, we’re telling our application to do two things:
Initialize from where it left off, if the app ID exists
Register that persister so it saves state on every step
This gives us flexibility – we can initialize but not persist (load for testing), we can persist but not initialize (start anew), and we can do both. While initializing but not persisting is a simple way to reload from a prior point in time, the forking feature in Burr allows you to both persist the new app, and load where it left off. You can then track the new application – link it to its parent (the application from which it was forked), and even compare different runs. To do this, you need to simply add a few more arguments to the initialize_from function:
.initialize_from(
    state_persister,
    resume_at_next_action=True,
    default_state={"count" : 0},
    default_entrypoint="count",
    fork_from_app_id=PARENT_APP_ID,
    fork_from_sequence_id=5
)
# remove with_identifiers to create a new one
In the UI this will show up as a forking application – indicating that this app derived from a parent application:
You can also track all forks from the parent application:
Thus you can navigate back in time, open up in multiple windows, compare state, etc…
A User Story
While we went over a simple counter example to demonstrate the forking capability above, it was actually inspired by a real use-case! Peanut Robotics has been leveraging Burr's state machine capabilities to help robots navigate spaces and interact with their environment via an LLM based robot agent. You can see the full example in the following video, where Ashis goes over how they use the forking capability to debug prior workflows:
Wrapping Up
In this post, we showed how you can use Burr to build basic state machines, and how you can leverage the forking feature
To get started with Burr, we recommend installing and running the demo:
pip install "burr[learn]"
burr # will open up in a new window
You can follow the instructions on the github repository for a more comprehensive onboarding.
Additional Resources
Join our Discord for help or if you have questions!
Github repository for Burr (give us a star if you like what you see!)


